Once a video has been recorded, a motion analysis can be started and the video can be analysed frame by frame. For example, to analyse a video where a student has thrown a ball. On the motion analysis main screen, the frames of the video are displayed. One can navigate through the frames using the seek bar or the back and next buttons below at the bottom.
Hint: Tap the screen to make the seek bar appear.
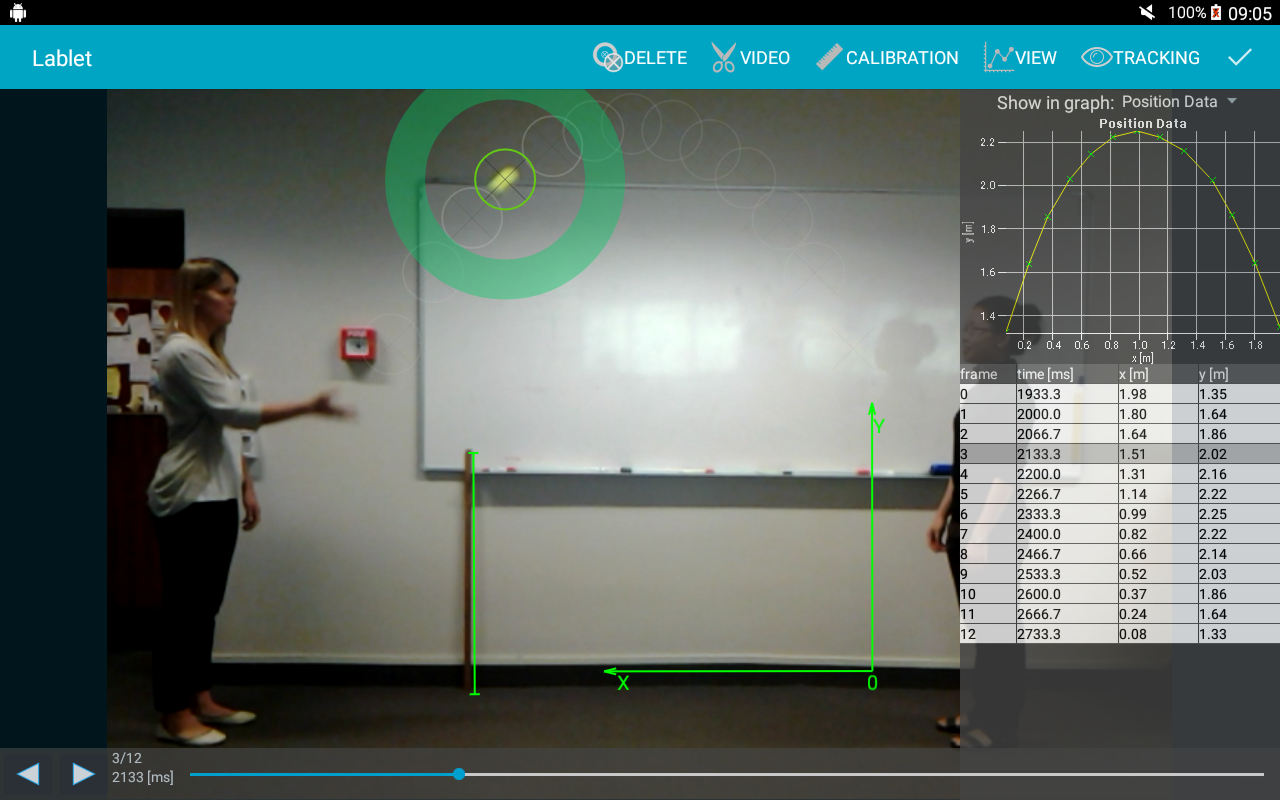
Tagging an object in a video.
Click the view menu item to show a summary graph and table of the tagged data. The graph can be zoomed in by tapping on it. Furthermore, the drop down menu above the graph can be used to show velocity plots of the taken data.
There are the following menu items in the top menu bar:
- Delete: Deletes the current selected marker.
- Video: Analysis settings screen for the recorded video, i.e. set analysis start and end points or adapt the analysis frame rate.
- Calibrate: Adjust the length scale and origin (see Data Tagging section below).
- View: Shows or hides the data view.
- Track: Object tracking menu (automatic object tracking across video frames).
- Done: Saves the analysis and quit (same as the back button).
Hint: When screen space is too small and not all menu item can be displayed in the menu bar Android places items into an overflow menu on the right side of the menu bar (sometime this overflow menu is only accessible through a hardware button):
If not all menu items can be displayed, items are hidden in Android’s overflow menu (on the right side).
Video Settings:
Before analysing a video, it’s recommended to first set the analysis start and end points of the video in the video settings screen. This helps to reduce video frames that are not part of the actual experiment, e.g. the recording before or after the actual throw. On the left side of the video settings screen, the recorded video is shown. One can seek through the video using the seek bar (with the white round knob). To select the analysis start and end points, use the blue knobs below the seek bar. The status bar below shows the start and end points and how many frames are in the selected range. On the right side, one can change the analysis frame rate. The default value is set to 10 fps. In order to take more or fewer data points, the frame rate can be increased or decreased. Note that after the frame rate has been changed, the analysis start and end points most likely needs to be updated as well.
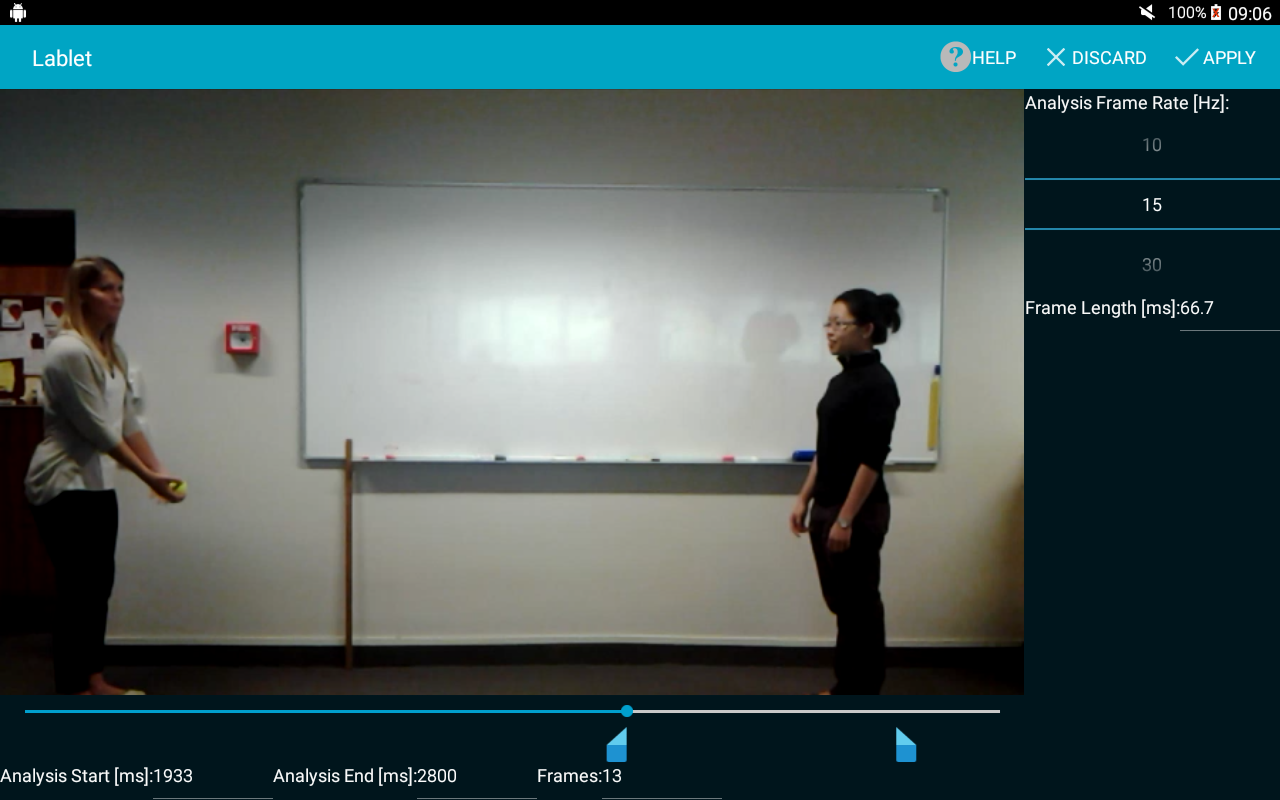
Motion analysis settings screen.
Data Tagging
In each video frame, there is one round, green highlighted tag marker. To select a different marker, go to the respective frame using the seek bar or the back and next buttons. To tag a data point, just touch the currently-selected marker (highlighted in green) and move it within the video frame view. The marker can be moved by dragging it at the centre or at the outer ring. In order to get optimal results, try to tag the same portion of the object to be tagged in each frame, e.g. the front facing tip of the thrown ball. Once a marker is positioned the graph, the data table is updated automatically.
Hint: Double tap the screen to go to the next frame and place the marker at the object of interest.
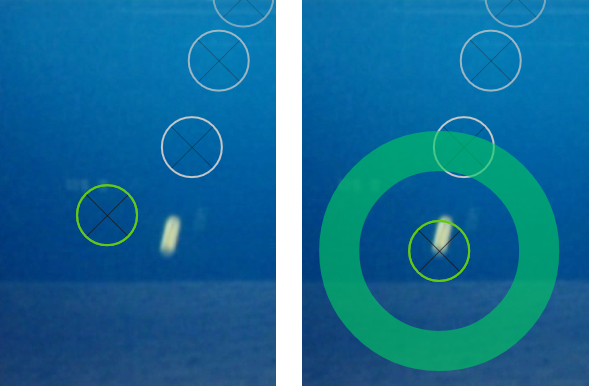
To tag an object: select a marker and move it over the ball by dragging it at the center or at the outer ring.
Note: In case a marker in a video frame has not been moved, the data point is discarded when selecting another frame.
Video Size Calibration and Orientation
In order to calibrate the size of a video, it is important to place a reference object with known size visible in the scene while recording the video, e.g. a meter scale. This reference object can be used to determine the scale of the video. Moreover, to get optimal results, the tablet should be hold parallel to the plane in which the experiment is performed.
In the video view, you can find a green length scale and a coordinate system.
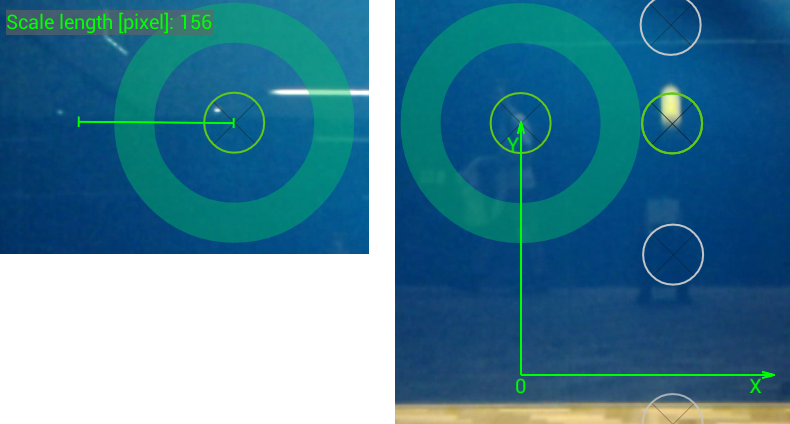
Length scale and coordinate system. Move or rotate the scale and the coordinate system by dragging them at their end points or at the coordinate system origin.
The length scale can be dragged at its endpoint to match a reference object in the video. Optional: the coordinate system can be dragged or rotated to set the experiment origin. The length of the scale can be defined in the calibration menu. Furthermore, the x and y axes of the coordinate system can be swapped in the calibration menu. This could, for example, be useful when a ball is thrown from the right to the left but the x-axis should point into the direction of the ball’s movement (swap axes and rotate by -90 degree).

Video calibration menu.
Object Tracking
Lablet can automatically track an object over multiple video frames. Object tracking works best for an object with a single dominant colour with high contrast to its background. Also try to keep the lighting of the video consistent.
To track an object go to a frame with the object you want to track. Select Choose Object from the Track menu and move the rectangle over the object by dragging its centre point. Drag the corners of the rectangle until it surrounds the whole object. If you accidentally seek to another frame before you have finished selecting the object, click Track and then Next object, which will return you back to the selected the object. The selection rectangle can be removed by clicking Track and Deselect object.
Once you have selected the object, start tracking it by clicking the Track menu and then Start. The video will now play and the objects positon will be tagged in each video frame. The time elapsed and time to finish is displayed in the top left corner of the screen. You can optionally visualise an outline of what the object tracker sees by clicking Track and then checking the Debug checkbox.
To stop the object tracker click Track and Stop, or click the stop button in the seek bar.
If the object tracker loses track of the object you may need to select it again after it has lost track.